

Magnet Replacement Procedure
Replace the Magnet in inside the sticks
If you need to replace or reset the Magnet inside the sticks, then this is the best way to ensure a strong fit.
- Choose a yellow glue or strong bonding glue. We have used Gorilla Glue that is used for multi-purpose surfaces, bonding to dissimilar surfaces (Ferrite Magnet to ABS Resin). The SKU part number for this glue is 1044400, but you can use any strong bonding glue.

- Wet the surface of the inside of the stick that the Magnet will go into. Then wipe the water off so that it is damp (most water removed). Some glues react with a damp surface for better adhesion.


- Clean the magnet surface that you will apply the glue to. In order to ensure that you have the correct side of the magnet, it is easier to stick the magnets together first, and ensure that you place the attaching side of the magnet face down on the table. Also, these magnets have a solid face, and one with a dot on it. The solid face matches to the face with a dot on it.


- Apply only one small drop of glue to the magnet face. DO NOT coat the whole magnet with glue from the bottle. Glue tends to expand on drying, and the excess glue will be forced out when curing.


- Use a toothpick or some other very thin device to coat the magnet face with the small drop of glue, so that the layer is now thin across the face of the magnet.

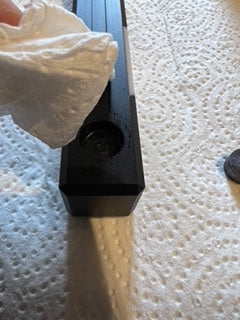
- using your fingers, delicately pick up the magnet and turn it over, and place carefully into the hole in the stick. When it is parallel to the stick and inside the hole, press the magnet down (quite hard). When it is firmly in place, there should be no excess glue escaping. If you do have excess glue, use a tissue to wipe the surface cleanly. On drying you will see excess glue escape, but as long as the sticks close properly with clean magnet contact, you will not affect the performance of the clap of the sticks.


- Apply a small piece of tape over the surface of the magnet. We recommend using paper tape (parcel tape or masking tape) which does not leave a residue on the sticks when taking the tape off. sticks the ends of the tape onto the other surface of the sticks, so that the magnet is held in place.


- Leave the magnet in place with the tape for 1-2 hours, after which the glue should have set. However, it’s best to leave the tape on to allow the glue to be cured for 24 hours. Remove the tape after curing, and test the sticks with constant clapping to ensure that the magnet is now in place.
If you should require assistance with your Filmsticks Clappersticks Magnets, please contact us and we will be happy to assist you.